Crochet Toddler Dress Pattern
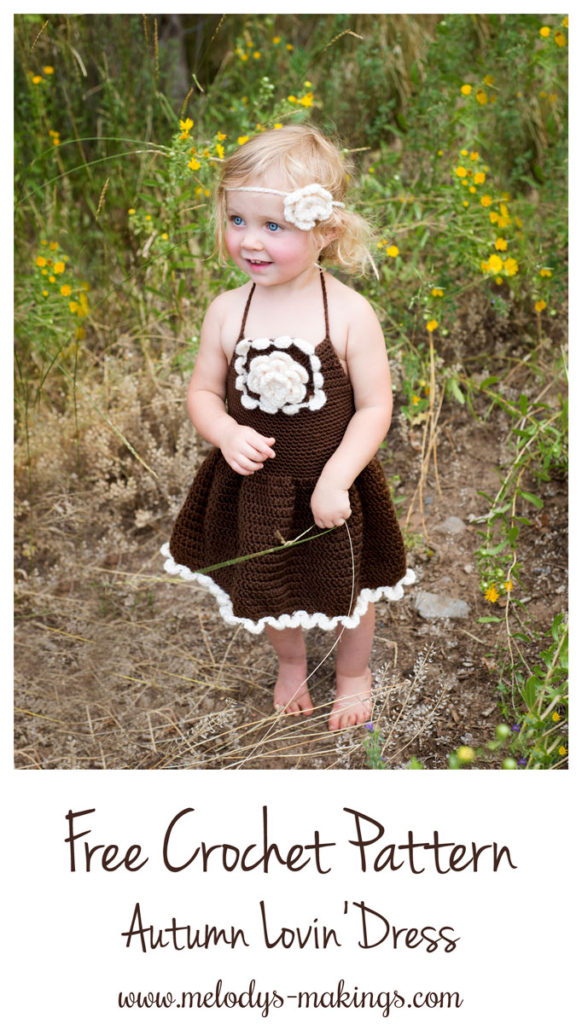
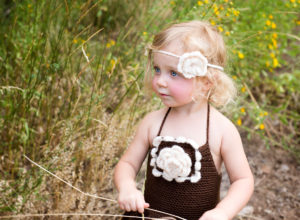
The Autumn Lovin’ dress crochet pattern is an adorable summer dress for toddler girls!
This pattern features a gorgeous flower in the center front, and is designed so each piece adds to the next….which means less finish work and seaming for you!
With all sizes Newborn baby through 5 years, your creations can grow along with the little girl you’re crafting for.
Crochet Toddler Dress Pattern
Materials:
- Yarn: Approximately 150 (125 of Base Color 1 & 25 of Accent Color 2) yards of worsted (4) yarn for smaller sizes and approx. 515 yards (450 of Base Color 1 & 65 of Accent Color 2) for larger sizes (I used Red Heart Soft)
- Crochet Hook: Size 5.5 mm (I/9) OR whatever size is needed to obtain gauge
- Yarn or Tapestry Needle
Abbreviations:
- DC: Double Crochet
- SC: Single Crochet
- CH: Chain
- **: Repeat the section in between the two stars as specified
Gauge:
8 sts and 9 rows = 2 inches (5 centimeters) in Single Crochet
***It is important to check your gauge!***
Resources:
Step by Step photos can be found in the video at the top of this post. You’ll also find them in the ad-free PDF copy of this pattern available in my Etsy shop here.
For more step-by-step photos of the flower section, visit and join my free Melody’s Makings Facebook group where this pattern was originally done as a create-a-long.
Average Head Circumference:
- Newborn: 13-14”
- 0-3 Months: 14-15”
- 3-6 Months: 14-17”
- 6-12 Months: 16-19”
- 1-3 Years: 18-20”
- 3-10 Years: 19-20.5”
Average Rib Cage (Dress) Circumference:
- Newborn: 14” (35.5cm)
- 0-3 Months: 15” (38cm)
- 3-6 Months: 16” (40.5cm)
- 6-12 Months: 17” (43.25cm)
- 1-2 Years: 18” (45.75cm)
- 3 Years: 19” (48.25cm)
- 4 Years: 20” (50.75cm)
- 5 Years: 21” (53.25cm)
Autumn Lovin’ Dress Pattern
Love this pattern and my work?
Help support this blog by purchasing an ad-free PDF copy of this pattern!
Get the ad-free copy on Ravelry here.
Get the ad-free copy on Etsy here.
Newborn Dress Pattern
Create a Magic Circle with 6 SC stitches in the center using Accent Color 2 Yarn
Join in the round by slip stitching first and last stitches together. Place Stitch Marker
Round 1: ~This round is worked through the front loop only~
(DC, CH2, DC, slip stitch) all into the same stitch you just slipped into, *(slip stitch, DC, CH2, DC, slip stitch) all into the next stitch* Repeat 4 more times, slip stitch into first stitch (36 total sts including beginning slip – 6 total flower petals)
{Reference Photos 1&2 for example of what your project should look like at this point}
Round 2: ~This round is worked into the same sts as round 1, but through the back loop only~
CH2, 2 DC sts into each stitch around, slip stitch into first stitch (12 total sts not including starting chain)
{Reference Photos 3&4 for example of what your project should look like at this point}
Drop Color 2 Yarn (do not cut) and Pick up Base Color 1 Yarn
Round 3: CH2, *DC into each of next two sts, 4 DC into next stitch* Repeat 3 more times, slip stitch into first stitch (24 total sts not including starting chain)
Your project should now be forming a square edge.
{Reference Photos 7-10 for example of what your project should look like at this point. Your project won’t match exactly due to size difference, but it should give a good idea.}
Drop and cut Color 1 Yarn and Pick up Accent Color 2 Yarn
Round 4: ~This round is worked through the front loop only~
(Slip stitch, 4 DC, slip stitch) all into next stitch, slip stitch into each of next two sts, (slip stitch, 6 DC, slip stitch) all into next stitch, *slip stitch into each of next two sts, (slip stitch, 4 DC, slip stitch) all into next stitch, slip stitch into each of next two sts, (slip stitch, 6 DC, slip stitch) all into next stitch* Repeat 2 more times, slip stitch into each of next two sts, slip stitch into first stitch (8 total border shells with two sts between each created)
Fasten off and weave in all ends.
{Reference Photos 11&12 for example of what your project should look like at this point. Your project won’t match exactly due to size difference, but it should give a good idea.}
During the next section, you’ll be turning your flower square into a trapezoid shape (working on one side at a time) to form the front section of the halter top. To do this, you’ll be doing one row of Single Crochet, through the back loop only, along the edge of flower square, and then slowly adding these sts into each row to connect the two sections.
With front of flower facing you, connect new strand of Base Color 1 yarn to bottom right corner of flower square.
{Reference Photos 13&14 for example of what your project should look like at this point}
Single Crochet 6 sts from edge of flower square through the back loop only.
{Reference Photo 15 for example of what your project should look like at this point}
Chain 6, Turn Work.
{Reference Photo 16 for example of what your project should look like at this point}
Row 1: Single crochet into the second chain from hook, and next 3 chains, SC2tog (one chain and one stitch), slip stitch into next stitch (this counts as your turning chain), Turn Work (5 total sts not including slip stitch)
{Reference Photos 17&18 for help with the end of Row 1}
Row 2: Single crochet into each stitch across to last stitch, 2 SC in last stitch, CH1, Turn Work (6 total sts)
Row 3: 2 SC in first stitch, Single crochet into each of next 4 sts, SC2tog, slip stitch into next stitch (this counts as your turning chain), Turn Work (7 total sts not including slip st)
Row 4: Single crochet into each stitch across to last stitch, 2 SC in last stitch, CH1, Turn Work (8 total sts)
Row 5: 2 SC in first stitch, Single crochet into each of next 6 sts, SC2tog, slip stitch into next stitch (this counts as your turning chain), Turn Work (9 total sts not including slip st)
Row 6: Single crochet into each stitch across to last stitch, 2 SC in last stitch (10 total sts)
Fasten off and weave in all ends.
{Reference Photo 19 for example of what your project should look like at this point}
With back of flower facing you, connect new strand of Base Color 1 yarn to bottom right corner of flower square
{Reference Photo 20 for example of what your project should look like at this point}
Single Crochet 6 sts from edge of flower square through the back loop only.
{Reference Photo 21 for example of what your project should look like at this point}
Chain 6, Turn Work.
Repeat Rows 1-6 to create the opposite side of the trapezoid shape.
Do not fasten off.
{Reference Photo 22 for example of what your project should look like at this point}
Your working yarn should now be on the outer edge of your trapezoid. If, for some reason, your yarn isn’t on that edge, Single Crochet across the previous row one more time so you’ll be completing the next step along the outside edge.
Chain 28 additional stitches
{Reference Photo 23 for example of what your project should look like at this point}
Join in the round by slip stitching into the outermost stitch on the opposite side of the trapezoid. Place Stitch Marker.
*Stop at this point to check your size measurements. Your project should measure approx. 14 inches (35.5cm) in circumference at this point. If your project does not measure correctly, add or remove chains as necessary to get it to the right measurement. Make sure the number you chain is a multiple of 4.*
You’ll now be working in continuous rounds.
Round 1: SC each of next 10 sts through both loops, SC each of next 8 sts (sts along the bottom of flower square, and one edge stitch on each side) through the front loop only, SC all remaining sts through both loops (56 total sts if completed as written)
{Reference Photos 24&25 for example of what your project should look like at this point}
Round 2: SC each stitch around (56 total sts)
Repeat Round 2 until your project measures approx. 5 inches (12.75cm) from the top edge of flower square (not including scallop trim).
Round 3: 2 DC into each stitch around (112 total sts if completed as written)
Round 4: DC each stitch around (112 total sts)
Repeat Round 4 until your project measures approx. 10 inches (25.5cm) from the top edge of flower square. Slip stitch into first stitch.
Turn work so outside of project is facing for next round.
Drop Base Color 1 and pick up Accent Color 2 yarn.
Round 5: ~This round is worked through the front loop only~
*Slip stitch into each of next three sts, (slip stitch, 4 DC, slip stitch) all into next stitch* Repeat around, slip stitch into first stitch (28 total border shells with 3 sts in between each created if completed as written)
Fasten off and weave in all ends.
Connect a strand of Base Color 1 yarn to top corner of trapezoid piece and chain to approx. 10 inches (25.5cm) to create a halter top tie. Fasten off and weave in all ends. Repeat for opposite side.
Repeat flower instructions and seam to a chain to use as tie-back headband.
0-3 Month Dress Pattern
Create a Magic Circle with 6 SC stitches in the center using Accent Color 2 Yarn
Join in the round by slip stitching first and last stitches together. Place Stitch Marker
Round 1: ~This round is worked through the front loop only~
(DC, CH2, DC, slip stitch) all into the same stitch you just slipped into, *(slip stitch, DC, CH2, DC, slip stitch) all into the next stitch* Repeat 4 more times, slip stitch into first stitch (36 total sts including beginning slip – 6 total flower petals)
{Reference Photos 1&2 for example of what your project should look like at this point}
Round 2: ~This round is worked into the same sts as round 1, but through the back loop only~
CH2, 2 DC sts into each stitch around, slip stitch into first stitch (12 total sts not including starting chain)
{Reference Photos 3&4 for example of what your project should look like at this point}
Drop Color 2 Yarn (do not cut) and Pick up Base Color 1 Yarn
Round 3: CH2, *DC into each of next two sts, 4 DC into next stitch* Repeat 3 more times, slip stitch into first stitch (24 total sts not including starting chain)
Your project should now be forming a square edge.
{Reference Photos 7-10 for example of what your project should look like at this point. Your project won’t match exactly due to size difference, but it should give a good idea.}
Drop and cut Color 1 Yarn and Pick up Accent Color 2 Yarn
Round 4 : ~This round is worked through the front loop only~
(Slip stitch, 4 DC, slip stitch) all into next stitch, slip stitch into each of next two sts, (slip stitch, 6 DC, slip stitch) all into next stitch, *slip stitch into each of next two sts, (slip stitch, 4 DC, slip stitch) all into next stitch, slip stitch into each of next two sts, (slip stitch, 6 DC, slip stitch) all into next stitch* Repeat 2 more times, slip stitch into each of next two sts, slip stitch into first stitch (8 total border shells with two sts between each created)
Fasten off and weave in all ends.
{Reference Photos 11&12 for example of what your project should look like at this point. Your project won’t match exactly due to size difference, but it should give a good idea.}
During the next section, you’ll be turning your flower square into a trapezoid shape (working on one side at a time) to form the front section of the halter top. To do this, you’ll be doing one row of Single Crochet, through the back loop only, along the edge of flower square, and then slowly adding these sts into each row to connect the two sections.
With front of flower facing you, connect new strand of Base Color 1 yarn to bottom right corner of flower square.
{Reference Photos 13&14 for example of what your project should look like at this point}
Single Crochet 6 sts from edge of flower square through the back loop only.
{Reference Photo 15 for example of what your project should look like at this point}
Chain 6, Turn Work.
{Reference Photos 16 for example of what your project should look like at this point}
Row 1: Single crochet into the second chain from hook, and next 3 chains, SC2tog (one chain and one stitch), slip stitch into next stitch (this counts as your turning chain), Turn Work (5 total sts not including slip stitch)
{Reference Photos 17&18 for help with the end of Row 1}
Row 2: Single crochet into each stitch across to last stitch, 2 SC in last stitch, CH1, Turn Work (6 total sts)
Row 3: 2 SC in first stitch, Single crochet into each of next 4 sts, SC2tog, slip stitch into next stitch (this counts as your turning chain), Turn Work (7 total sts not including slip st)
Row 4: Single crochet into each stitch across to last stitch, 2 SC in last stitch, CH1, Turn Work (8 total sts)
Row 5: 2 SC in first stitch, Single crochet into each of next 6 sts, SC2tog, slip stitch into next stitch (this counts as your turning chain), Turn Work (9 total sts not including slip st)
Row 6: Single crochet into each stitch across to last stitch, 2 SC in last stitch (10 total sts)
Fasten off and weave in all ends.
{Reference Photo 19 for example of what your project should look like at this point}
With back of flower facing you, connect new strand of Base Color 1 yarn to bottom right corner of flower square
{Reference Photo 20 for example of what your project should look like at this point}
Single Crochet 6 sts from edge of flower square through the back loop only.
{Reference Photo 21 for example of what your project should look like at this point}
Chain 6, Turn Work.
Repeat Rows 1-6 to create the opposite side of the trapezoid shape.
Do not fasten off.
{Reference Photo 22 for example of what your project should look like at this point}
Your working yarn should now be on the outer edge of your trapezoid. If, for some reason, your yarn isn’t on that edge, Single Crochet across the previous row one more time so you’ll be completing the next step along the outside edge.
Chain 32 additional stitches
{Reference Photo 23 for example of what your project should look like at this point}
Join in the round by slip stitching into the outermost stitch on the opposite side of the trapezoid. Place Stitch Marker.
*Stop at this point to check your size measurements. Your project should measure approx. 15 inches (38cm) in circumference at this point. If your project does not measure correctly, add or remove chains as necessary to get it to the right measurement. Make sure the number you chain is a multiple of 4.*
You’ll now be working in continuous rounds.
Round 1: SC each of next 10 sts through both loops, SC each of next 8 sts (sts along the bottom of flower square, and one edge stitch on each side) through the front loop only, SC all remaining sts through both loops (60 total sts if completed as written)
{Reference Photos 24&25 for example of what your project should look like at this point}
Round 2: SC each stitch around (60 total sts)
Repeat Round 2 until your project measures approx. 5.5 inches (14cm) from the top edge of flower square (not including scallop trim).
Round 3: 2 DC into each stitch around (120 total sts if completed as written)
Round 4: DC each stitch around (120 total sts)
Repeat Round 4 until your project measures approx. 11 inches (28cm) from the top edge of flower square. Slip stitch into first stitch.
Turn work so outside of project is facing for next round.
Drop Base Color 1 and pick up Accent Color 2 yarn.
Round 5: ~This round is worked through the front loop only~
*Slip stitch into each of next three sts, (slip stitch, 4 DC, slip stitch) all into next stitch* Repeat around, slip stitch into first stitch (30 total border shells with 3 sts in between each created if completed as written)
Fasten off and weave in all ends.
Connect a strand of Base Color 1 yarn to top corner of trapezoid piece and chain to approx. 10 inches (25.5cm) to create a halter top tie. Fasten off and weave in all ends. Repeat for opposite side.
Repeat flower instructions and seam to a chain to use as tie-back headband.
3-6 Month Dress Pattern
Create a Magic Circle with 6 SC stitches in the center using Accent Color 2 Yarn
Join in the round by slip stitching first and last stitches together. Place Stitch Marker
Round 1: ~This round is worked through the front loop only~
(DC, CH2, DC, slip stitch) all into the same stitch you just slipped into, *(slip stitch, DC, CH2, DC, slip stitch) all into the next stitch* Repeat 4 more times, slip stitch into first stitch (36 total sts including beginning slip – 6 total flower petals)
{Reference Photos 1&2 for example of what your project should look like at this point}
Round 2: ~This round is worked into the same sts as round 1, but through the back loop only~
CH2, 2 DC sts into each stitch around, slip stitch into first stitch (12 total sts not including starting chain)
{Reference Photos 3&4 for example of what your project should look like at this point}
Round 3: ~This round is worked through the front loop only~
(4 DC sts, slip stitch) all into the same stitch you just slipped into, slip stitch into next stitch, *(slip stitch, 4 DC sts, slip stitch) all into the next stitch, slip stitch into next stitch* Repeat 4 more times, slip stitch into first stitch (36 total sts including beginning slip – 6 total flower petals)
{Reference Photos 5&6 for example of what your project should look like at this point}
Drop Color 2 Yarn (do not cut) and Pick up Base Color 1 Yarn
Round 4: ~This round is worked into the same sts as round 3, but through the back loop only~
CH2, *2 DC sts into next stitch, DC into next stitch* Repeat around, slip stitch into first stitch (18 total sts not including starting chain)
{Reference Photos 7&8 for example of what your project should look like at this point}
Round 5: CH2, *DC into each of next three sts, 4 DC into next stitch, DC into each of next four sts, 4 DC into next stitch* Repeat once, slip stitch into first stitch (30 total sts not including starting chain)
Your project should now be forming a square edge.
{Reference Photos 9&10 for example of what your project should look like at this point}
Drop and cut Color 1 Yarn and Pick up Accent Color 2 Yarn
Round 6: ~This round is worked through the front loop only~
*(Slip stitch, 4 DC, slip stitch) all into next stitch, slip stitch into each of next three sts, (slip stitch, 6 DC, slip stitch) all into next stitch, slip stitch into each of next three sts, (slip stitch, 4 DC, slip stitch) all into next stitch, slip stitch into each of next three sts, (slip stitch, 6 DC, slip stitch) all into next stitch, Slip stitch into next two sts* Repeat once, slip stitch into first stitch (8 total border shells with either two or three sts between each created)
Fasten off and weave in all ends.
{Reference Photos 11&12 for example of what your project should look like at this point}
During the next section, you’ll be turning your flower square into a trapezoid shape (working on one side at a time) to form the front section of the halter top. To do this, you’ll be doing one row of Single Crochet, through the back loop only, along the edge of flower square, and then slowly adding these sts into each row to connect the two sections.
With front of flower facing you, connect new strand of Base Color 1 yarn to bottom right corner of flower square.
{Reference Photos 13&14 for example of what your project should look like at this point}
Single Crochet 8 sts from edge of flower square through the back loop only.
{Reference Photo 15 for example of what your project should look like at this point}
Chain 6, Turn Work.
{Reference Photo 16 for example of what your project should look like at this point}
Row 1: Single crochet into the second chain from hook, and next 3 chains, SC2tog (one chain and one stitch), slip stitch into next stitch (this counts as your turning chain), Turn Work (5 total sts not including slip stitch)
{Reference Photos 17&18 for help with the end of Row 1}
Row 2: Single crochet into each stitch across to last stitch, 2 SC in last stitch, CH1, Turn Work (6 total sts)
Row 3: Single crochet into each of next 5 sts, SC2tog, slip stitch into next stitch (this counts as your turning chain), Turn Work (6 total sts not including slip st)
Row 4: Single crochet into each stitch across to last stitch, 2 SC in last stitch, CH1, Turn Work (7 total sts)
Row 5: Single crochet into each of next 6 sts, SC2tog, slip stitch into next stitch (this counts as your turning chain), Turn Work (7 total sts not including slip sts into flower square)
Row 6: Single crochet into each stitch across to last stitch, 2 SC in last stitch, CH1, Turn Work (8 total sts)
Row 7: 2 SC in first stitch, Single crochet into each of next 6 sts, SC2tog, slip stitch into next stitch (this counts as your turning chain), Turn Work (9 total sts)
Row 8: Single crochet into each stitch across to last stitch, 2 SC in last stitch (10 total sts)
Fasten off and weave in all ends.
Reference Diagram 5 for example of what your project should look like at this point.
{Reference Photo 19 for example of what your project should look like at this point}
With back of flower facing you, connect new strand of Base Color 1 yarn to bottom right corner of flower square
{Reference Photo 20 for example of what your project should look like at this point}
Single Crochet 8 sts from edge of flower square through the back loop only.
{Reference Photo 21 for example of what your project should look like at this point}
Chain 6, Turn Work.
Repeat Rows 1-8 to create the opposite side of the trapezoid shape.
Do not fasten off.
{Reference Photo 22 for example of what your project should look like at this point}
Your working yarn should now be on the outer edge of your trapezoid. If, for some reason, your yarn isn’t on that edge, Single Crochet across the previous row one more time so you’ll be completing the next step along the outside edge.
Chain 35 additional stitches
{Reference Photo 23 for example of what your project should look like at this point}
Join in the round by slip stitching into the outermost stitch on the opposite side of the trapezoid. Place Stitch Marker.
*Stop at this point to check your size measurements. Your project should measure approx. 16 inches (40.5cm) in circumference at this point. If your project does not measure correctly, add or remove chains as necessary to get it to the right measurement. Make sure the number you chain is a multiple of 4 + 3*
You’ll now be working in continuous rounds.
Round 1: SC each of next 10 sts through both loops, SC each of next 9 sts (sts along the bottom of flower square, and one edge stitch on each side) through the front loop only, SC all remaining sts through both loops (64 total sts if completed as written)
{Reference Photos 24&25 for example of what your project should look like at this point}
Round 2: SC each stitch around (64 total sts)
Repeat Round 2 until your project measures approx. 6 inches (15.25cm) from the top edge of flower square (not including scallop trim).
Round 3: 2 DC into each stitch around (128 total sts if completed as written)
Round 4: DC each stitch around (128 total sts)
Repeat Round 4 until your project measures approx. 12 inches (30.5cm) from the top edge of flower square. Slip stitch into first stitch.
Turn work so outside of project is facing for next round.
Drop Base Color 1 and pick up Accent Color 2 yarn.
Round 5: ~This round is worked through the front loop only~
*Slip stitch into each of next three sts, (slip stitch, 4 DC, slip stitch) all into next stitch* Repeat around, slip stitch into first stitch (32 total border shells with 3 sts in between each created if completed as written)
Fasten off and weave in all ends.
Connect a strand of Base Color 1 yarn to top corner of trapezoid piece and chain to approx. 10 inches (25.5cm) to create a halter top tie. Fasten off and weave in all ends. Repeat for opposite side.
Repeat flower instructions and seam to a chain to use as tie-back headband.
6-12 Month Dress Pattern
Create a Magic Circle with 6 SC stitches in the center using Accent Color 2 Yarn
Join in the round by slip stitching first and last stitches together. Place Stitch Marker
Round 1: ~This round is worked through the front loop only~
(DC, CH2, DC, slip stitch) all into the same stitch you just slipped into, *(slip stitch, DC, CH2, DC, slip stitch) all into the next stitch* Repeat 4 more times, slip stitch into first stitch (36 total sts including beginning slip – 6 total flower petals)
{Reference Photos 1&2 for example of what your project should look like at this point}
Round 2: ~This round is worked into the same sts as round 1, but through the back loop only~
CH2, 2 DC sts into each stitch around, slip stitch into first stitch (12 total sts not including starting chain)
{Reference Photos 3&4 for example of what your project should look like at this point}
Round 3: ~This round is worked through the front loop only~
(4 DC sts, slip stitch) all into the same stitch you just slipped into, slip stitch into next stitch, *(slip stitch, 4 DC sts, slip stitch) all into the next stitch, slip stitch into next stitch* Repeat 4 more times, slip stitch into first stitch (36 total sts including beginning slip – 6 total flower petals)
Drop Color 2 Yarn (do not cut) and Pick up Base Color 1 Yarn
{Reference Photos 5&6 for example of what your project should look like at this point}
Round 4: ~This round is worked into the same sts as round 3, but through the back loop only~
CH2, *2 DC sts into next stitch, DC into next stitch* Repeat around, slip stitch into first stitch (18 total sts not including starting chain)
{Reference Photos 7&8 for example of what your project should look like at this point}
Round 5: CH2, *DC into each of next three sts, 4 DC into next stitch, DC into each of next four sts, 4 DC into next stitch* Repeat once, slip stitch into first stitch (30 total sts not including starting chain)
Your project should now be forming a square edge.
{Reference Photos 9&10 for example of what your project should look like at this point}
Drop and cut Color 1 Yarn and Pick up Accent Color 2 Yarn
Round 6: ~This round is worked through the front loop only~
*(Slip stitch, 4 DC, slip stitch) all into next stitch, slip stitch into each of next three sts, (slip stitch, 6 DC, slip stitch) all into next stitch, slip stitch into each of next three sts, (slip stitch, 4 DC, slip stitch) all into next stitch, slip stitch into each of next three sts, (slip stitch, 6 DC, slip stitch) all into next stitch, Slip stitch into next two sts* Repeat once, slip stitch into first stitch (8 total border shells with either two or three sts between each created)
Fasten off and weave in all ends.
{Reference Photos 11&12 for example of what your project should look like at this point}
During the next section, you’ll be turning your flower square into a trapezoid shape (working on one side at a time) to form the front section of the halter top. To do this, you’ll be doing one row of Single Crochet, through the back loop only, along the edge of flower square, and then slowly adding these sts into each row to connect the two sections.
With front of flower facing you, connect new strand of Base Color 1 yarn to bottom right corner of flower square.
{Reference Photos 13&14 for example of what your project should look like at this point}
Single Crochet 8 sts from edge of flower square through the back loop only.
{Reference Photo 15 for example of what your project should look like at this point}
Chain 6, Turn Work.
{Reference Photo 16 for example of what your project should look like at this point}
Row 1: Single crochet into the second chain from hook, and next 3 chains, SC2tog (one chain and one stitch), slip stitch into next stitch (this counts as your turning chain), Turn Work (5 total sts not including slip stitch)
{Reference Photos 17&18 for help with the end of Row 1}
Row 2: Single crochet into each stitch across to last stitch, 2 SC in last stitch, CH1, Turn Work (6 total sts)
Row 3: Single crochet into each of next 5 sts, SC2tog, slip stitch into next stitch (this counts as your turning chain), Turn Work (6 total sts not including slip st)
Row 4: Single crochet into each stitch across to last stitch, 2 SC in last stitch, CH1, Turn Work (7 total sts)
Row 5: Single crochet into each of next 6 sts, SC2tog, slip stitch into next stitch (this counts as your turning chain), Turn Work (7 total sts not including slip sts into flower square)
Row 6: Single crochet into each stitch across to last stitch, 2 SC in last stitch, CH1, Turn Work (8 total sts)
Row 7: 2 SC in first stitch, Single crochet into each of next 6 sts, SC2tog, slip stitch into next stitch (this counts as your turning chain), Turn Work (9 total sts)
Row 8: Single crochet into each stitch across to last stitch, 2 SC in last stitch (10 total sts)
Fasten off and weave in all ends.
{Reference Photo 19 for example of what your project should look like at this point}
With back of flower facing you, connect new strand of Base Color 1 yarn to bottom right corner of flower square
{Reference Photo 20 for example of what your project should look like at this point}
Single Crochet 8 sts from edge of flower square through the back loop only.
{Reference Photo 21 for example of what your project should look like at this point}
Chain 6, Turn Work.
Repeat Rows 1-8 to create the opposite side of the trapezoid shape.
Do not fasten off.
{Reference Photo 22 for example of what your project should look like at this point}
Your working yarn should now be on the outer edge of your trapezoid. If, for some reason, your yarn isn’t on that edge, Single Crochet across the previous row one more time so you’ll be completing the next step along the outside edge.
Chain 39 additional stitches
{Reference Photo 23 for example of what your project should look like at this point}
Join in the round by slip stitching into the outermost stitch on the opposite side of the trapezoid. Place Stitch Marker.
*Stop at this point to check your size measurements. Your project should measure approx. 17 inches (43.25cm) in circumference at this point. If your project does not measure correctly, add or remove chains as necessary to get it to the right measurement. Make sure the number you chain is a multiple of 4 + 3*
You’ll now be working in continuous rounds.
Round 1: SC each of next 10 sts through both loops, SC each of next 9 sts (sts along the bottom of flower square, and one edge stitch on each side) through the front loop only, SC all remaining sts through both loops (68 total sts if completed as written)
{Reference Photos 24&25 for example of what your project should look like at this point}
Round 2: SC each stitch around (68 total sts)
Repeat Round 2 until your project measures approx. 7 inches (17.75cm) from the top edge of flower square (not including scallop trim).
Round 3: 2 DC into each stitch around (136 total sts if completed as written)
Round 4: DC each stitch around (136 total sts)
Repeat Round 4 until your project measures approx. 14 inches (35.5cm) from the top edge of flower square. Slip stitch into first stitch.
Turn work so outside of project is facing for next round.
Drop Base Color 1 and pick up Accent Color 2 yarn.
Round 5: ~This round is worked through the front loop only~
*Slip stitch into each of next three sts, (slip stitch, 4 DC, slip stitch) all into next stitch* Repeat around, slip stitch into first stitch (34 total border shells with 3 sts in between each created if completed as written)
Fasten off and weave in all ends.
Connect a strand of Base Color 1 yarn to top corner of trapezoid piece and chain to approx. 10 inches (25.5cm) to create a halter top tie. Fasten off and weave in all ends. Repeat for opposite side.
Repeat flower instructions and seam to a chain to use as tie-back headband.
1-2 Year Dress Pattern
Create a Magic Circle with 6 SC stitches in the center using Accent Color 2 Yarn
Join in the round by slip stitching first and last stitches together. Place Stitch Marker
Round 1: ~This round is worked through the front loop only~
(DC, CH2, DC, slip stitch) all into the same stitch you just slipped into, *(slip stitch, DC, CH2, DC, slip stitch) all into the next stitch* Repeat 4 more times, slip stitch into first stitch (36 total sts including beginning slip – 6 total flower petals)
{Reference Photos 1&2 for example of what your project should look like at this point}
Round 2: ~This round is worked into the same sts as round 1, but through the back loop only~
CH2, 2 DC sts into each stitch around, slip stitch into first stitch (12 total sts not including starting chain)
{Reference Photos 3&4 for example of what your project should look like at this point}
Round 3: ~This round is worked through the front loop only~
(4 DC sts, slip stitch) all into the same stitch you just slipped into, slip stitch into next stitch, *(slip stitch, 4 DC sts, slip stitch) all into the next stitch, slip stitch into next stitch* Repeat 4 more times, slip stitch into first stitch (36 total sts including beginning slip – 6 total flower petals)
{Reference Photos 5&6 for example of what your project should look like at this point}
Round 4: ~This round is worked into the same sts as round 3, but through the back loop only~
CH2, *2 DC sts into next stitch, DC into next stitch* Repeat around, slip stitch into first stitch (18 total sts not including starting chain)
Round 5: ~This round is worked through the front loop only~
(7 DC sts, slip stitch) all into the same stitch you just slipped into, slip stitch into each of next two sts, *(slip stitch, 7 DC sts, slip stitch) all into the next stitch, slip stitch into each of next two sts* Repeat 4 more times, slip stitch into first stitch (54 total sts including beginning slip – 6 total flower petals)
Drop Color 2 Yarn (do not cut) and Pick up Base Color 1 Yarn
Round 6: ~This round is worked into the same sts as round 5, but through the back loop only~
CH2, *2 DC sts into next stitch, DC into each of next two sts* Repeat around, slip stitch into first stitch (24 total sts not including starting chain)
{Reference Photos 7&8 for example of what your project should look like at this point. Your project won’t match exactly due to size difference, but it should give a good idea.}
Round 7: CH2, *DC into each of next five sts, 4 DC into next stitch* Repeat 3 more times, slip stitch into first stitch (36 total sts not including starting chain)
Your project should now be forming a square edge.
{Reference Photos 9&10 for example of what your project should look like at this point Your project won’t match exactly due to size difference, but it should give a good idea.}
Round 8: CH2, DC into each of next six sts, 4 DC into next stitch, *DC into each of next eight sts, 4 DC into next stitch* Repeat 2 more times, DC into each of next two sts, slip stitch into first stitch (48 total sts not including starting chain)
Drop and cut Color 1 Yarn and Pick up Accent Color 2 Yarn
Round 9: ~This round is worked through the front loop only~
(Slip stitch, 4 DC, slip stitch) all into next stitch, slip stitch into each of next three sts, (slip stitch, 4 DC, slip stitch) all into next stitch, slip stitch into each of next three sts, (slip stitch, 6 DC, slip stitch) all into next stitch, *slip stitch into each of next three sts, (slip stitch, 4 DC, slip stitch) all into next stitch, slip stitch into each of next three sts, (slip stitch, 4 DC, slip stitch) all into next stitch, slip stitch into each of next three sts, (slip stitch, 6 DC, slip stitch) all into next stitch* Repeat 2 more times, slip stitch into each of next three sts, slip stitch into first stitch (12 total border shells with three sts between each created)
Fasten off and weave in all ends.
{Reference Photos 11&12 for example of what your project should look like at this point. Your project won’t match exactly due to size difference, but it should give a good idea.}
During the next section, you’ll be turning your flower square into a trapezoid shape (working on one side at a time) to form the front section of the halter top. To do this, you’ll be doing one row of Single Crochet, through the back loop only, along the edge of flower square, and then slowly adding these sts into each row to connect the two sections.
With front of flower facing you, connect new strand of Base Color 1 yarn to bottom right corner of flower square.
{Reference Photos 13&14 for example of what your project should look like at this point}
Single Crochet 12 sts from edge of flower square through the back loop only.
{Reference Photo 15 for example of what your project should look like at this point}
Chain 5, Turn Work.
{Reference Photo 16 for example of what your project should look like at this point}
Row 1: Single crochet into the second chain from hook, and next 2 chains, SC2tog (one chain and one edge stitch), slip stitch into next stitch (this counts as your turning chain), Turn Work (4 total sts not including slip stitch)
Row 2: Single crochet into each stitch across to last stitch, 2 SC in last stitch, CH1, Turn Work (5 total sts)
Row 3: Single crochet into each of next 4 sts, SC2tog, slip stitch into next stitch (this counts as your turning chain), Turn Work (5 total sts not including slip stitch)
Row 4: Single crochet into each stitch across to last stitch, 2 SC in last stitch, CH1, Turn Work (6 total sts)
Row 5: Single crochet into each of next 5 sts, SC2tog, slip stitch into next stitch (this counts as your turning chain), Turn Work (6 total sts not including slip st)
Row 6: Single crochet into each stitch across to last stitch, 2 SC in last stitch, CH1, Turn Work (7 total sts)
Row 7: Single crochet into each of next 6 sts, SC2tog, slip stitch into next stitch (this counts as your turning chain), Turn Work (7 total sts not including slip st)
Row 8: Single crochet into each stitch across to last stitch, 2 SC in last stitch, CH1, Turn Work (8 total sts)
Row 9: Single crochet into each of next 7 sts, SC2tog, slip stitch into next stitch (this counts as your turning chian), Turn Work (8 total sts not including slip st)
Row 10: Single crochet into each stitch across to last stitch, 2 SC in last stitch, CH1, Turn Work (9 total sts)
Row 11: Single crochet into each of next 8 sts, SC2tog, slip stitch into next stitch (this counts as your turning chain), Turn Work (9 total sts not including slip st)
Row 12: Single crochet into each stitch across to last stitch, 2 SC in last stitch (10 total sts)
Fasten off and weave in all ends.
{Reference Photo 19 for example of what your project should look like at this point}
With back of flower facing you, connect new strand of Base Color 1 yarn to bottom right corner of flower square
{Reference Photo 20 for example of what your project should look like at this point}
Single Crochet 12 sts from edge of flower square through the back loop only.
{Reference Photo 21 for example of what your project should look like at this point}
Chain 5, Turn Work.
Repeat Rows 1-12 to create the opposite side of the trapezoid shape.
Do not fasten off.
{Reference Photo 22 for example of what your project should look like at this point}
Your working yarn should now be on the outer edge of your trapezoid. If, for some reason, your yarn isn’t on that edge, Single Crochet across the previous row one more time so you’ll be completing the next step along the outside edge.
Chain 38 additional stitches
{Reference Photo 23 for example of what your project should look like at this point}
Join in the round by slip stitching into the outermost stitch on the opposite side of the trapezoid. Place Stitch Marker.
*Stop at this point to check your size measurements. Your project should measure approx. 18 inches (45.75cm) in circumference at this point. If your project does not measure correctly, add or remove chains as necessary to get it to the right measurement. Make sure the number you chain is a multiple of 4 + 2*
You’ll now be working in continuous rounds.
Round 1: SC each of next 10 sts through both loops, SC each of next 14 sts (sts along the bottom of flower square, and one edge stitch on each side) through the front loop only, SC all remaining sts through both loops (72 total sts if completed as written)
{Reference Photos 24&25 for example of what your project should look like at this point}
Round 2: SC each stitch around (72 total sts)
Repeat Round 2 until your project measures approx. 8 inches (20.25cm) from the top edge of flower square (not including scallop trim).
Round 3: 2 DC into each stitch around (144 total sts if completed as written)
Round 4: DC each stitch around (144 total sts)
Repeat Round 4 until your project measures approx. 16 inches (40.5cm) from the top edge of flower square. Slip stitch into first stitch.
Turn work so outside of project is facing for next round.
Drop Base Color 1 and pick up Accent Color 2 yarn.
Round 5: ~This round is worked through the front loop only~
*Slip stitch into each of next three sts, (slip stitch, 4 DC, slip stitch) all into next stitch* Repeat around, slip stitch into first stitch (36 total border shells with 3 sts in between each created if completed as written)
Fasten off and weave in all ends.
Connect a strand of Base Color 1 yarn to top corner of trapezoid piece and chain to approx. 12 inches (30.5cm) to create a halter top tie. Fasten off and weave in all ends. Repeat for opposite side.
Repeat flower instructions and seam to a chain to use as tie-back headband.
3 Year Dress Pattern
Create a Magic Circle with 6 SC stitches in the center using Accent Color 2 Yarn
Join in the round by slip stitching first and last stitches together. Place Stitch Marker
Round 1: ~This round is worked through the front loop only~
(DC, CH2, DC, slip stitch) all into the same stitch you just slipped into, *(slip stitch, DC, CH2, DC, slip stitch) all into the next stitch* Repeat 4 more times, slip stitch into first stitch (36 total sts including beginning slip – 6 total flower petals)
{Reference Photos 1&2 for example of what your project should look like at this point}
Round 2: ~This round is worked into the same sts as round 1, but through the back loop only~
CH2, 2 DC sts into each stitch around, slip stitch into first stitch (12 total sts not including starting chain)
{Reference Photos 3&4 for example of what your project should look like at this point}
Round 3: ~This round is worked through the front loop only~
(4 DC sts, slip stitch) all into the same stitch you just slipped into, slip stitch into next stitch, *(slip stitch, 4 DC sts, slip stitch) all into the next stitch, slip stitch into next stitch* Repeat 4 more times, slip stitch into first stitch (36 total sts including beginning slip – 6 total flower petals)
{Reference Photos 5&6 for example of what your project should look like at this point}
Round 4: ~This round is worked into the same sts as round 3, but through the back loop only~
CH2, *2 DC sts into next stitch, DC into next stitch* Repeat around, slip stitch into first stitch (18 total sts not including starting chain)
Round 5: ~This round is worked through the front loop only~
(7 DC sts, slip stitch) all into the same stitch you just slipped into, slip stitch into each of next two sts, *(slip stitch, 7 DC sts, slip stitch) all into the next stitch, slip stitch into each of next two sts* Repeat 4 more times, slip stitch into first stitch (54 total sts including beginning slip – 6 total flower petals)
Drop Color 2 Yarn (do not cut) and Pick up Base Color 1 Yarn
Round 6: ~This round is worked into the same sts as round 5, but through the back loop only~
CH2, *2 DC sts into next stitch, DC into each of next two sts* Repeat around, slip stitch into first stitch (24 total sts not including starting chain)
{Reference Photos 7&8 for example of what your project should look like at this point. Your project won’t match exactly due to size difference, but it should give a good idea.}
Round 7: CH2, *DC into each of next five sts, 4 DC into next stitch* Repeat 3 more times, slip stitch into first stitch (36 total sts not including starting chain)
Your project should now be forming a square edge.
{Reference Photos 9&10 for example of what your project should look like at this point Your project won’t match exactly due to size difference, but it should give a good idea.}
Round 8: CH2, DC into each of next six sts, 4 DC into next stitch, *DC into each of next eight sts, 4 DC into next stitch* Repeat 2 more times, DC into each of next two sts, slip stitch into first stitch (48 total sts not including starting chain)
Drop and cut Color 1 Yarn and Pick up Accent Color 2 Yarn
Round 9: ~This round is worked through the front loop only~
(Slip stitch, 4 DC, slip stitch) all into next stitch, slip stitch into each of next three sts, (slip stitch, 4 DC, slip stitch) all into next stitch, slip stitch into each of next three sts, (slip stitch, 6 DC, slip stitch) all into next stitch, *slip stitch into each of next three sts, (slip stitch, 4 DC, slip stitch) all into next stitch, slip stitch into each of next three sts, (slip stitch, 4 DC, slip stitch) all into next stitch, slip stitch into each of next three sts, (slip stitch, 6 DC, slip stitch) all into next stitch* Repeat 2 more times, slip stitch into each of next three sts, slip stitch into first stitch (12 total border shells with three sts between each created)
Fasten off and weave in all ends.
{Reference Photos 11&12 for example of what your project should look like at this point. Your project won’t match exactly due to size difference, but it should give a good idea.}
During the next section, you’ll be turning your flower square into a trapezoid shape (working on one side at a time) to form the front section of the halter top. To do this, you’ll be doing one row of Single Crochet, through the back loop only, along the edge of flower square, and then slowly adding these sts into each row to connect the two sections.
With front of flower facing you, connect new strand of Base Color 1 yarn to bottom right corner of flower square.
{Reference Photos 13&14 for example of what your project should look like at this point}
Single Crochet 12 sts from edge of flower square through the back loop only.
{Reference Photo 15 for example of what your project should look like at this point}
Chain 5, Turn Work.
{Reference Photo 16 for example of what your project should look like at this point}
Row 1: Single crochet into the second chain from hook, and next 2 chains, SC2tog (one chain and one edge stitch), slip stitch into next stitch (this counts as your turning chain), Turn Work (4 total sts not including slip stitch)
Row 2: Single crochet into each stitch across to last stitch, 2 SC in last stitch, CH1, Turn Work (5 total sts)
Row 3: Single crochet into each of next 4 sts, SC2tog, slip stitch into next stitch (this counts as your turning chain), Turn Work (5 total sts not including slip stitch)
Row 4: Single crochet into each stitch across to last stitch, 2 SC in last stitch, CH1, Turn Work (6 total sts)
Row 5: Single crochet into each of next 5 sts, SC2tog, slip stitch into next stitch (this counts as your turning chain), Turn Work (6 total sts not including slip st)
Row 6: Single crochet into each stitch across to last stitch, 2 SC in last stitch, CH1, Turn Work (7 total sts)
Row 7: Single crochet into each of next 6 sts, SC2tog, slip stitch into next stitch (this counts as your turning chain), Turn Work (7 total sts not including slip st)
Row 8: Single crochet into each stitch across to last stitch, 2 SC in last stitch, CH1, Turn Work (8 total sts)
Row 9: Single crochet into each of next 7 sts, SC2tog, slip stitch into next stitch (this counts as your turning chian), Turn Work (8 total sts not including slip st)
Row 10: Single crochet into each stitch across to last stitch, 2 SC in last stitch, CH1, Turn Work (9 total sts)
Row 11: 2 SC in first stitch, Single crochet into each of next 7 sts, SC2tog, slip stitch into next stitch (this counts as your turning chain), Turn Work (10 total sts not including slip st)
Row 12: Single crochet into each stitch across to last stitch, 2 SC in last stitch (11 total sts)
Fasten off and weave in all ends.
{Reference Photo 19 for example of what your project should look like at this point}
With back of flower facing you, connect new strand of Base Color 1 yarn to bottom right corner of flower square
{Reference Photo 20 for example of what your project should look like at this point}
Single Crochet 12 sts from edge of flower square through the back loop only.
{Reference Photo 21 for example of what your project should look like at this point}
Chain 5, Turn Work.
Repeat Rows 1-12 to create the opposite side of the trapezoid shape.
Do not fasten off.
{Reference Photo 22 for example of what your project should look like at this point}
Your working yarn should now be on the outer edge of your trapezoid. If, for some reason, your yarn isn’t on that edge, Single Crochet across the previous row one more time so you’ll be completing the next step along the outside edge.
Chain 40 additional stitches
{Reference Photo 23 for example of what your project should look like at this point}
Join in the round by slip stitching into the outermost stitch on the opposite side of the trapezoid. Place Stitch Marker.
*Stop at this point to check your size measurements. Your project should measure approx. 19 inches (48.25cm) in circumference at this point. If your project does not measure correctly, add or remove chains as necessary to get it to the right measurement. Make sure the number you chain is a multiple of 4*
You’ll now be working in continuous rounds.
Round 1: SC each of next 11 sts through both loops, SC each of next 14 sts (sts along the bottom of flower square, and one edge stitch on each side) through the front loop only, SC all remaining sts through both loops (76 total sts if completed as written)
{Reference Photos 24&25 for example of what your project should look like at this point}
Round 2: SC each stitch around (76 total sts)
Repeat Round 2 until your project measures approx. 9 inches (22.75cm) from the top edge of flower square (not including scallop trim).
Round 3: 2 DC into each stitch around (152 total sts if completed as written)
Round 4: DC each stitch around (152 total sts)
Repeat Round 4 until your project measures approx. 18 inches (45.75cm) from the top edge of flower square. Slip stitch into first stitch.
Turn work so outside of project is facing for next round.
Drop Base Color 1 and pick up Accent Color 2 yarn.
Round 5: ~This round is worked through the front loop only~
*Slip stitch into each of next three sts, (slip stitch, 4 DC, slip stitch) all into next stitch* Repeat around, slip stitch into first stitch (38 total border shells with 3 sts in between each created if completed as written)
Fasten off and weave in all ends.
Connect a strand of Base Color 1 yarn to top corner of trapezoid piece and chain to approx. 12 inches (30.5cm) to create a halter top tie. Fasten off and weave in all ends. Repeat for opposite side.
Repeat flower instructions and seam to a chain to use as tie-back headband.
4 Year Dress Pattern
Create a Magic Circle with 6 SC stitches in the center using Accent Color 2 Yarn
Join in the round by slip stitching first and last stitches together. Place Stitch Marker
Round 1: ~This round is worked through the front loop only~
(DC, CH2, DC, slip stitch) all into the same stitch you just slipped into, *(slip stitch, DC, CH2, DC, slip stitch) all into the next stitch* Repeat 4 more times, slip stitch into first stitch (36 total sts including beginning slip – 6 total flower petals)
{Reference Photos 1&2 for example of what your project should look like at this point}
Round 2: ~This round is worked into the same sts as round 1, but through the back loop only~
CH2, 2 DC sts into each stitch around, slip stitch into first stitch (12 total sts not including starting chain)
{Reference Photos 3&4 for example of what your project should look like at this point}
Round 3: ~This round is worked through the front loop only~
(4 DC sts, slip stitch) all into the same stitch you just slipped into, slip stitch into next stitch, *(slip stitch, 4 DC sts, slip stitch) all into the next stitch, slip stitch into next stitch* Repeat 4 more times, slip stitch into first stitch (36 total sts including beginning slip – 6 total flower petals)
{Reference Photos 5&6 for example of what your project should look like at this point}
Round 4: ~This round is worked into the same sts as round 3, but through the back loop only~
CH2, *2 DC sts into next stitch, DC into next stitch* Repeat around, slip stitch into first stitch (18 total sts not including starting chain)
Round 5: ~This round is worked through the front loop only~
(7 DC sts, slip stitch) all into the same stitch you just slipped into, slip stitch into each of next two sts, *(slip stitch, 7 DC sts, slip stitch) all into the next stitch, slip stitch into each of next two sts* Repeat 4 more times, slip stitch into first stitch (54 total sts including beginning slip – 6 total flower petals)
Drop Color 2 Yarn (do not cut) and Pick up Base Color 1 Yarn
Round 6: ~This round is worked into the same sts as round 5, but through the back loop only~
CH2, *2 DC sts into next stitch, DC into each of next two sts* Repeat around, slip stitch into first stitch (24 total sts not including starting chain)
{Reference Photos 7&8 for example of what your project should look like at this point. Your project won’t match exactly due to size difference, but it should give a good idea.}
Round 7: CH2, *DC into each of next five sts, 4 DC into next stitch* Repeat 3 more times, slip stitch into first stitch (36 total sts not including starting chain)
Your project should now be forming a square edge.
{Reference Photos 9&10 for example of what your project should look like at this point Your project won’t match exactly due to size difference, but it should give a good idea.}
Round 8: CH2, DC into each of next six sts, 4 DC into next stitch, *DC into each of next eight sts, 4 DC into next stitch* Repeat 2 more times, DC into each of next two sts, slip stitch into first stitch (48 total sts not including starting chain)
Drop and cut Color 1 Yarn and Pick up Accent Color 2 Yarn
Round 9: ~This round is worked through the front loop only~
(Slip stitch, 4 DC, slip stitch) all into next stitch, slip stitch into each of next three sts, (slip stitch, 4 DC, slip stitch) all into next stitch, slip stitch into each of next three sts, (slip stitch, 6 DC, slip stitch) all into next stitch, *slip stitch into each of next three sts, (slip stitch, 4 DC, slip stitch) all into next stitch, slip stitch into each of next three sts, (slip stitch, 4 DC, slip stitch) all into next stitch, slip stitch into each of next three sts, (slip stitch, 6 DC, slip stitch) all into next stitch* Repeat 2 more times, slip stitch into each of next three sts, slip stitch into first stitch (12 total border shells with three sts between each created)
Fasten off and weave in all ends.
{Reference Photos 11&12 for example of what your project should look like at this point. Your project won’t match exactly due to size difference, but it should give a good idea.}
During the next section, you’ll be turning your flower square into a trapezoid shape (working on one side at a time) to form the front section of the halter top. To do this, you’ll be doing one row of Single Crochet, through the back loop only, along the edge of flower square, and then slowly adding these sts into each row to connect the two sections.
With front of flower facing you, connect new strand of Base Color 1 yarn to bottom right corner of flower square.
{Reference Photos 13&14 for example of what your project should look like at this point}
Single Crochet 12 sts from edge of flower square through the back loop only.
{Reference Photo 15 for example of what your project should look like at this point}
Chain 5, Turn Work.
{Reference Photo 16 for example of what your project should look like at this point}
Row 1: Single crochet into the second chain from hook, and next 2 chains, SC2tog (one chain and one edge stitch), slip stitch into next stitch (this counts as your turning chain), Turn Work (4 total sts not including slip stitch)
Row 2: Single crochet into each stitch across to last stitch, 2 SC in last stitch, CH1, Turn Work (5 total sts)
Row 3: Single crochet into each of next 4 sts, SC2tog, slip stitch into next stitch (this counts as your turning chain), Turn Work (5 total sts not including slip stitch)
Row 4: Single crochet into each stitch across to last stitch, 2 SC in last stitch, CH1, Turn Work (6 total sts)
Row 5: Single crochet into each of next 5 sts, SC2tog, slip stitch into next stitch (this counts as your turning chain), Turn Work (6 total sts not including slip st)
Row 6: Single crochet into each stitch across to last stitch, 2 SC in last stitch, CH1, Turn Work (7 total sts)
Row 7: Single crochet into each of next 6 sts, SC2tog, slip stitch into next stitch (this counts as your turning chain), Turn Work (7 total sts not including slip st)
Row 8: Single crochet into each stitch across to last stitch, 2 SC in last stitch, CH1, Turn Work (8 total sts)
Row 9: 2 SC in first stitch, Single crochet into each of next 6 sts, SC2tog, slip stitch into next stitch (this counts as your turning chian), Turn Work (9 total sts not including slip st)
Row 10: Single crochet into each stitch across to last stitch, 2 SC in last stitch, CH1, Turn Work (10 total sts)
Row 11: 2 SC in first stitch, Single crochet into each of next 8 sts, SC2tog, slip stitch into next stitch (this counts as your turning chain), Turn Work (11 total sts not including slip st)
Row 12: Single crochet into each stitch across to last stitch, 2 SC in last stitch (12 total sts)
Fasten off and weave in all ends.
{Reference Photo 19 for example of what your project should look like at this point}
With back of flower facing you, connect new strand of Base Color 1 yarn to bottom right corner of flower square
{Reference Photo 20 for example of what your project should look like at this point}
Single Crochet 12 sts from edge of flower square through the back loop only.
{Reference Photo 21 for example of what your project should look like at this point}
Chain 5, Turn Work.
Repeat Rows 1-12 to create the opposite side of the trapezoid shape.
Do not fasten off.
{Reference Photo 22 for example of what your project should look like at this point}
Your working yarn should now be on the outer edge of your trapezoid. If, for some reason, your yarn isn’t on that edge, Single Crochet across the previous row one more time so you’ll be completing the next step along the outside edge.
Chain 42 additional stitches
{Reference Photo 23 for example of what your project should look like at this point}
Join in the round by slip stitching into the outermost stitch on the opposite side of the trapezoid. Place Stitch Marker.
*Stop at this point to check your size measurements. Your project should measure approx. 20 inches (50.75cm) in circumference at this point. If your project does not measure correctly, add or remove chains as necessary to get it to the right measurement. Make sure the number you chain is a multiple of 4 + 2*
You’ll now be working in continuous rounds.
Round 1: SC each of next 12 sts through both loops, SC each of next 14 sts (sts along the bottom of flower square, and one edge stitch on each side) through the front loop only, SC all remaining sts through both loops (80 total sts if completed as written)
{Reference Photos 24&25 for example of what your project should look like at this point}
Round 2: SC each stitch around (80 total sts)
Repeat Round 2 until your project measures approx. 10 inches (25.5cm) from the top edge of flower square (not including scallop trim).
Round 3: 2 DC into each stitch around (160 total sts if completed as written)
Round 4: DC each stitch around (160 total sts)
Repeat Round 4 until your project measures approx. 20 inches (50.75cm) from the top edge of flower square. Slip stitch into first stitch.
Turn work so outside of project is facing for next round.
Drop Base Color 1 and pick up Accent Color 2 yarn.
Round 5: ~This round is worked through the front loop only~
*Slip stitch into each of next three sts, (slip stitch, 4 DC, slip stitch) all into next stitch* Repeat around, slip stitch into first stitch (40 total border shells with 3 sts in between each created if completed as written)
Fasten off and weave in all ends.
Connect a strand of Base Color 1 yarn to top corner of trapezoid piece and chain to approx. 12 inches (30.5cm) to create a halter top tie. Fasten off and weave in all ends. Repeat for opposite side.
Repeat flower instructions and seam to a chain to use as tie-back headband.
5 Year Dress Pattern
Create a Magic Circle with 6 SC stitches in the center using Accent Color 2 Yarn
Join in the round by slip stitching first and last stitches together. Place Stitch Marker
Round 1: ~This round is worked through the front loop only~
(DC, CH2, DC, slip stitch) all into the same stitch you just slipped into, *(slip stitch, DC, CH2, DC, slip stitch) all into the next stitch* Repeat 4 more times, slip stitch into first stitch (36 total sts including beginning slip – 6 total flower petals)
{Reference Photos 1&2 for example of what your project should look like at this point}
Round 2: ~This round is worked into the same sts as round 1, but through the back loop only~
CH2, 2 DC sts into each stitch around, slip stitch into first stitch (12 total sts not including starting chain)
{Reference Photos 3&4 for example of what your project should look like at this point}
Round 3: ~This round is worked through the front loop only~
(4 DC sts, slip stitch) all into the same stitch you just slipped into, slip stitch into next stitch, *(slip stitch, 4 DC sts, slip stitch) all into the next stitch, slip stitch into next stitch* Repeat 4 more times, slip stitch into first stitch (36 total sts including beginning slip – 6 total flower petals)
{Reference Photos 5&6 for example of what your project should look like at this point}
Round 4: ~This round is worked into the same sts as round 3, but through the back loop only~
CH2, *2 DC sts into next stitch, DC into next stitch* Repeat around, slip stitch into first stitch (18 total sts not including starting chain)
Round 5: ~This round is worked through the front loop only~
(7 DC sts, slip stitch) all into the same stitch you just slipped into, slip stitch into each of next two sts, *(slip stitch, 7 DC sts, slip stitch) all into the next stitch, slip stitch into each of next two sts* Repeat 4 more times, slip stitch into first stitch (54 total sts including beginning slip – 6 total flower petals)
Drop Color 2 Yarn (do not cut) and Pick up Base Color 1 Yarn
Round 6: ~This round is worked into the same sts as round 5, but through the back loop only~
CH2, *2 DC sts into next stitch, DC into each of next two sts* Repeat around, slip stitch into first stitch (24 total sts not including starting chain)
{Reference Photos 7&8 for example of what your project should look like at this point. Your project won’t match exactly due to size difference, but it should give a good idea.}
Round 7: CH2, *DC into each of next five sts, 4 DC into next stitch* Repeat 3 more times, slip stitch into first stitch (36 total sts not including starting chain)
Your project should now be forming a square edge.
{Reference Photos 9&10 for example of what your project should look like at this point Your project won’t match exactly due to size difference, but it should give a good idea.}
Round 8: CH2, DC into each of next six sts, 4 DC into next stitch, *DC into each of next eight sts, 4 DC into next stitch* Repeat 2 more times, DC into each of next two sts, slip stitch into first stitch (48 total sts not including starting chain)
Drop and cut Color 1 Yarn and Pick up Accent Color 2 Yarn
Round 9: ~This round is worked through the front loop only~
(Slip stitch, 4 DC, slip stitch) all into next stitch, slip stitch into each of next three sts, (slip stitch, 4 DC, slip stitch) all into next stitch, slip stitch into each of next three sts, (slip stitch, 6 DC, slip stitch) all into next stitch, *slip stitch into each of next three sts, (slip stitch, 4 DC, slip stitch) all into next stitch, slip stitch into each of next three sts, (slip stitch, 4 DC, slip stitch) all into next stitch, slip stitch into each of next three sts, (slip stitch, 6 DC, slip stitch) all into next stitch* Repeat 2 more times, slip stitch into each of next three sts, slip stitch into first stitch (12 total border shells with three sts between each created)
Fasten off and weave in all ends.
{Reference Photos 11&12 for example of what your project should look like at this point. Your project won’t match exactly due to size difference, but it should give a good idea.}
During the next section, you’ll be turning your flower square into a trapezoid shape (working on one side at a time) to form the front section of the halter top. To do this, you’ll be doing one row of Single Crochet, through the back loop only, along the edge of flower square, and then slowly adding these sts into each row to connect the two sections.
With front of flower facing you, connect new strand of Base Color 1 yarn to bottom right corner of flower square.
{Reference Photos 13&14 for example of what your project should look like at this point}
Single Crochet 12 sts from edge of flower square through the back loop only.
{Reference Photo 15 for example of what your project should look like at this point}
Chain 5, Turn Work.
{Reference Photo 16 for example of what your project should look like at this point}
Row 1: Single crochet into the second chain from hook, and next 2 chains, SC2tog (one chain and one edge stitch), slip stitch into next stitch (this counts as your turning chain), Turn Work (4 total sts not including slip stitch)
Row 2: Single crochet into each stitch across to last stitch, 2 SC in last stitch, CH1, Turn Work (5 total sts)
Row 3: Single crochet into each of next 4 sts, SC2tog, slip stitch into next stitch (this counts as your turning chain), Turn Work (5 total sts not including slip stitch)
Row 4: Single crochet into each stitch across to last stitch, 2 SC in last stitch, CH1, Turn Work (6 total sts)
Row 5: 2 SC in first stitch, Single crochet into each of next 4 sts, SC2tog, slip stitch into next stitch (this counts as your turning chain), Turn Work (7 total sts not including slip st)
Row 6: Single crochet into each stitch across to last stitch, 2 SC in last stitch, CH1, Turn Work (8 total sts)
Row 7: 2 SC in first stitch, Single crochet into each of next 6 sts, SC2tog, slip stitch into next stitch (this counts as your turning chain), Turn Work (9 total sts not including slip st)
Row 8: Single crochet into each stitch across to last stitch, 2 SC in last stitch, CH1, Turn Work (10 total sts)
Row 9: 2 SC in first stitch, Single crochet into each of next 8 sts, SC2tog, slip stitch into next stitch (this counts as your turning chian), Turn Work (11 total sts not including slip st)
Row 10: Single crochet into each stitch across to last stitch, 2 SC in last stitch, CH1, Turn Work (12 total sts)
Row 11: 2 SC in first stitch, Single crochet into each of next 10 sts, SC2tog, slip stitch into next stitch (this counts as your turning chain), Turn Work (13 total sts not including slip st)
Row 12: Single crochet into each stitch across to last stitch, 2 SC in last stitch (14 total sts)
{Reference Photo 19 for example of what your project should look like at this point}
With back of flower facing you, connect new strand of Base Color 1 yarn to bottom right corner of flower square
{Reference Photo 20 for example of what your project should look like at this point}
Single Crochet 12 sts from edge of flower square through the back loop only.
{Reference Photo 21 for example of what your project should look like at this point}
Chain 5, Turn Work.
Repeat Rows 1-12 to create the opposite side of the trapezoid shape.
Do not fasten off.
{Reference Photo 22 for example of what your project should look like at this point}
Chain 42 additional stitches
{Reference Photo 23 for example of what your project should look like at this point}
Join in the round by slip stitching into the outermost stitch on the opposite side of the trapezoid. Place Stitch Marker.
*Stop at this point to check your size measurements. Your project should measure approx. 21 inches (53.25cm) in circumference at this point. If your project does not measure correctly, add or remove chains as necessary to get it to the right measurement. Make sure the number you chain is a multiple of 4 + 2*
You’ll now be working in continuous rounds.
Round 1: SC each of next 14 sts through both loops, SC each of next 14 sts (sts along the bottom of flower square, and one edge stitch on each side) through the front loop only, SC all remaining sts through both loops (84 total sts if completed as written)
{Reference Photos 24&25 for example of what your project should look like at this point}
Round 2: SC each stitch around (84 total sts)
Repeat Round 2 until your project measures approx. 11 inches (28cm) from the top edge of flower square (not including scallop trim).
Round 3: 2 DC into each stitch around (168 total sts if completed as written)
Round 4: DC each stitch around (168 total sts)
Repeat Round 4 until your project measures approx. 22 inches (55.75cm) from the top edge of flower square. Slip stitch into first stitch.
Turn work so outside of project is facing for next round.
Drop Base Color 1 and pick up Accent Color 2 yarn.
Round 5: ~This round is worked through the front loop only~
*Slip stitch into each of next three sts, (slip stitch, 4 DC, slip stitch) all into next stitch* Repeat around, slip stitch into first stitch (42 total border shells with 3 sts in between each created if completed as written)
Fasten off and weave in all ends.
Connect a strand of Base Color 1 yarn to top corner of trapezoid piece and chain to approx. 12 inches (30.5cm) to create a halter top tie. Fasten off and weave in all ends. Repeat for opposite side.
Repeat flower instructions and seam to a chain to use as tie-back
This design, a written work and images are a copyright of
©MelodysMakings and may not be copied or reproduced in any way. You have permission to sell finished products made from this pattern, but please leave a link to my website, www.melodys-makings.com, in your product listing specifying that I am the designer of this pattern. Thank you for supporting me as a work at home mother!
Where are all the reference pictures? thanks!
You’ll find them in the video at the top of the page 🙂